Quick Answer
Deep Water Culture suspends plant roots directly in oxygenated, nutrient-rich water. An air pump keeps dissolved oxygen high enough to prevent root rot, making DWC one of the fastest-growing hydroponic methods available to home growers. --- What is Deep Water Culture and how does it differ from other hydroponic systems? Deep Water Culture (DWC) is a hydroponic method where plant…
Deep Water Culture suspends plant roots directly in oxygenated, nutrient-rich water. An air pump keeps dissolved oxygen high enough to prevent root rot, making DWC one of the fastest-growing hydroponic methods available to home growers.
What is Deep Water Culture and how does it differ from other hydroponic systems?
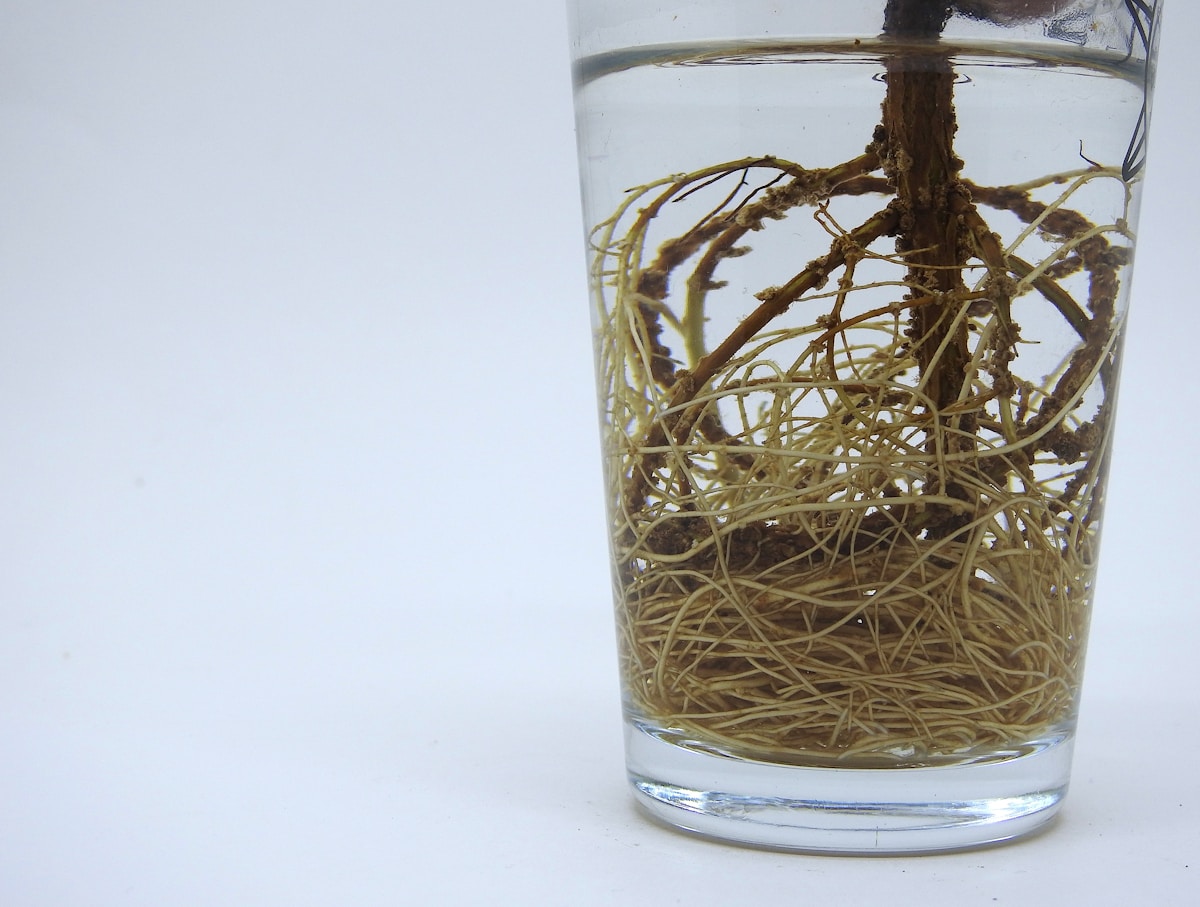
Deep Water Culture (DWC) is a hydroponic method where plant roots hang continuously submerged in a reservoir of nutrient solution. Unlike systems such as NFT or ebb-and-flow, where solution is delivered intermittently, DWC keeps roots wet at all times. The key safety mechanism is aeration: an aquarium-style air pump forces air through a bubbler stone at the reservoir bottom, saturating the water with dissolved oxygen. Without this oxygen, submerged roots would suffocate and rot within days.
The simplicity of DWC is a major appeal. A basic system needs only a reservoir (typically a 5–20 litre opaque bucket), a net pot lid, growing medium such as clay pebbles to anchor the plant, an air pump, airline tubing, and a bubbler stone. Because there are no timers, spray nozzles, or flood trays to maintain, failure points are minimal. This makes DWC a reliable starting point for growers comfortable with basic hydroponics but looking for faster results than the Kratky passive method.
Growth rates in DWC are genuinely impressive. Roots have uninterrupted access to water, nutrients, and oxygen simultaneously — the trifecta that drives rapid vegetative growth. Lettuce commonly reaches harvest size in 25–30 days, compared with 45–60 days in soil. Tomatoes, peppers, and cannabis all respond strongly to DWC conditions when nutrients and pH are dialled in.
The main limitation is that DWC is less forgiving than soil. Because roots are always submerged, any interruption to aeration — a power cut, a clogged air stone — can cause rapid root damage. Temperature is also critical; reservoir water above 22 °C loses dissolved oxygen quickly and promotes pythium (root rot).
How do you set up a DWC system from scratch?
Setting up a single-bucket DWC system takes about an hour and costs between £20–£50 for basic components. Start by choosing a 10–15 litre opaque bucket with a tight-fitting lid. Opacity is essential: light reaching the reservoir promotes algae growth that competes with plants and depletes oxygen. Cut a hole in the lid sized to accept a 50–75 mm net pot snugly.
Fill the reservoir so that the bottom of the net pot sits just above the waterline — roughly 2–3 cm of airspace between net pot base and nutrient solution. As roots grow down through the net pot and into the solution, they self-adjust. In early seedling stages, some growers raise the water level so it just touches the net pot base; once roots are established, dropping the level to create an air gap stimulates faster root development through the oxygen-rich zone.
Thread airline tubing from your air pump down through a small hole in the lid to the bubbler stone on the reservoir floor. Choose an air pump rated for at least 1.5 litres per minute for a 10-litre bucket — more is generally better. Run the pump continuously, 24 hours a day. Plug it into a surge-protected socket and consider a battery backup for critical crops.
Fill with pH-adjusted nutrient solution (more on this below) and transplant a rooted seedling into the net pot, filling around the stem with rinsed clay pebbles for support. Label the bucket with the plant variety and start date, and check the reservoir daily during the first week.
What nutrients and pH levels does DWC require?
DWC nutrient management follows the same principles as other hydroponic methods but demands tighter tolerances because any imbalance affects roots immediately. A three-part nutrient system — Grow, Bloom, and Micro, or a simpler two-part formula — works well. Mix nutrients into water before testing and adjusting pH; adding pH Up or Down after nutrients are mixed gives a more accurate final reading.
Target an Electrical Conductivity (EC) of 0.8–1.2 mS/cm for seedlings and young plants, rising to 1.8–2.4 mS/cm for mature fruiting plants. Leafy greens can be harvested at the lower end of this range, while heavy-feeding crops like tomatoes benefit from EC closer to 2.0–2.5 mS/cm. Measure EC with a calibrated pen meter; recalibrate monthly.
pH for DWC should sit between 5.5 and 6.2, with 5.8 considered the sweet spot. At this range, all essential macro and micronutrients are soluble and available for root uptake. pH above 6.5 locks out iron, manganese, and zinc; pH below 5.5 makes phosphorus and calcium less available. Check pH daily, especially in the first two weeks when plant uptake is high and pH fluctuates more.
Top up the reservoir with plain pH-adjusted water between full nutrient changes. Do a complete reservoir change every 7–14 days to prevent nutrient salt build-up and microbial accumulation. When changing the solution, rinse net pots and bubbler stones, but avoid disturbing established roots.
What are the most common DWC problems and how do you fix them?
Root rot (pythium) is the most serious DWC problem. Affected roots turn brown or grey and develop a slimy texture and unpleasant smell. Healthy roots are white or light tan and slightly fuzzy. Prevention is far easier than cure: keep reservoir temperature between 18–21 °C, maintain strong aeration, and keep light completely excluded from the reservoir. Adding beneficial bacteria products (such as Hydroguard or Great White) at recommended doses significantly reduces pythium risk.
Nutrient deficiencies appear on leaves and stems. Yellowing of older lower leaves typically indicates nitrogen deficiency — raise EC slightly and ensure pH is correct so nitrogen can be absorbed. Yellowing between leaf veins on younger leaves (interveinal chlorosis) points to iron or manganese lockout from pH being too high. Purple tints on stems and undersides of leaves suggest phosphorus deficiency, often caused by low temperatures rather than absent nutrients.
Algae growth appears as green or brown slime on reservoir walls and roots. It is caused entirely by light leaks. Inspect lids, net pot holes, and reservoir sides for pinholes or cracks. Cover all light entry points with black tape or opaque material. Once algae is established, drain and scrub the reservoir with a mild hydrogen peroxide solution (3 ml of 3% H₂O₂ per litre of water), rinse thoroughly, and restart.
Salt build-up on exposed bucket walls above the waterline is normal and indicates healthy nutrient levels. Wipe it away during reservoir changes. If you see white crust forming rapidly on roots or the bubbler stone, your EC may be too high — dilute the solution and increase change frequency.
Frequently Asked Questions
How large should my DWC reservoir be?
Can I run DWC without an air pump?
How often should I change the nutrient solution?
Some links in this article are affiliate links. If you purchase through them, we may earn a small commission — at no extra cost to you.